Friday 26 April 2013

Inspiration, thy name be Disney

Milly loves Stitch.  Stitch is the only Disney character in Paris she would actually touch, despite my annoying parent who wants a cute picture persuading.  If we could turn the dog in to Stitch I think Milly would be happy forever and never suffer any form of teen angst.  I should look in to that a little further.


So,  during the 5139th showing of Lilo and Stitch one morning I happened to look up from my pringles * induced haze ** and said character was dressed as Elvis. Pregnancy brain then kicked in and said mmmmm peanut butter and bananas, which is one up on the banana and marmite that I craved with Milly.  Now, I'm not a big Elvis fan but something in my mind must associate those things with each other so I decided to decamp to the kitchen.

Blue Suede Shoes Not Required


140g self raising flour
40g soft brown sugar
40g caster sugar
1 large very ripe banana
3 tbsp smooth peanut butter
2 x 40g bar of chocolate (or there about)
50g butter or marg

My oven : 140

Mush the banana with a fork. 
Cream together the butters, sugars and the banana until it looks like something you really should pour down the sink.

Chop one of the bars of chocolate in to small chunks of lovely.  Eat the other one.  Stir the chunks in to the gloop.

Dance in the flour to the who knows what mess in your bowl and mix well until it looks more food like.  


Just like with the other recipe for peanut butter cookies, take a tsp or so of the mix, roll in to a ball and squash on to a tray.

Bake for around 30 minutes or until brown.  

Obligatory Milk and Cookies Shot


Eat in front of the 5140th showing of Lilo and Stitch


* Other crisp products are available
** No actual haze occurred.

Souvenirs

We didn't get trapped in Lapland for 4 months, which is a shame because it was an amazing holiday and Yllas is like something from a dream.  If you're thinking of doing a Santa trip I would say go for it.  It was absolutely worth every single penny we spent.  Check out the view from our balcony


There is something exceptionally magical about sledging all day before taking a sleigh ride through the forest in the moonlight and then returning to your apartment for a wonderful sauna and a couple of glasses of something to warm you up.  So magical that we didn't just bring back our usual tacky fridge magnet.

So by the time Christmas was done and I was ready to resume Mummy and Milly day, the morning sickness kicked in.  Unfortunately it stayed and I'm still waiting for that wonderful period of blooming and feeling a million dollars to happen, which means that doing anything that wasn't eating pringles on the sofa became a bit of a struggle and keeping up with the blog side of life slipped rather a lot.  We've still been doing our crafts and cookery, but on a slightly smaller scale than before so its time to play catch up.

Friday 14 December 2012

I'll Be Home for Christmas

Hopefully, assuming we don't have a problem with our flight.  We are now all ready for Christmas - presents are wrapped, food for the hamper is made, Milly's rag doll is almost finished and the spare room has become cardboard box city from all the deliveries.  Must do something with those in the new year.  I'm thinking play shop.

This week we made biscotti (or sausage biscuits as miss likes to call them) and its a recipe from good food, so I'll just give you a link to that below.  We stuck almost to the recipe but I substituted cherry for cranberries, just because I like them.  We did, however, do a very very quick gift craft which makes a relatively low cost gift a little more personal.  Its another of those where you do most of the work, but such is life with kids and crafting.

Here Comes Santa Claus


You will need:

A vase big enough to put your entire hand inside
A sharpie (remember those from the labels?)
Paper and pens
Sticky tape of whichever brand you prefer

Cut your paper so its no larger than the height of your vase

Ask your child to draw whatever pictures you (or rather they) want.  Milly decided on Father Christmas, a snowman, a helicopter cat and a round Christmas tree. 


Cut out the pictures you want to put on to the vase (I decided on Father Christmas and the snowman, plus her name) and tape them on the inside.

Trace around with the sharpie.  You might need to do this a couple of times because the pen doesn't always draw that well.  I should imagine it would be better on a ceramic but then you have the faff of getting the picture on there in the first place.  Its one for us to do in future when Mill can be trusted to not draw a helicopter cat on something.

Remove the paper and allow to dry.  Jobs a good un.


I haven't tried to wash these so I have no idea if the picture is going to wash off the minute it touches water, but I don't think it really matters since they still have a vase at the end of it.

We've also been tagging and wrapping.  The bird seed feeders now look like this

Home made bird seed feeders
Bird Seed Feeders with a touch of Christmas Sparkle


and our Christmas hampers look like this (minus the bag of biscotti)
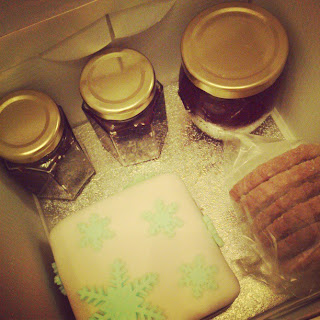
Small Christmas Hamper
Christmas Food Goodies


if you want a list of the recipes I've used here you go:
Spiced beetroot and orange chutney   This is lovely and can be done at last minute
Spiced plum chutney  I make this every year.  Its a bit late for it to be ready for Christmas but its still suitable for a gift with strict instructions to leave it for a few weeks.
Christmas Cake I make mine in October but there is no reason why you cant do a last minute version.

Champagne and Strawberry Jam  


This is my recipe and it makes an 8oz jar of jam .

You will need :

200g strawberries
180g jam sugar
1 large bottle of champagne (or cava)
1 lemon.
A saucer in the fridge

Chop the strawberries in to 4 and add to a pan with the sugar.  Leave for about an hour for the juices to start flowing (or don't if you're in a rush).  If you want big chunky strawberries at the end, leave overnight.

Add a squeeze of the lemon and about half a glass of champagne.  Get your saucer ready.

Heat gently to dissolve the sugar, stirring as you go, and then bring to the boil.for about 5 minutes (double check after four).  Remove from the heat and spread a little on the saucer, give it a minute and then push it about a bit.  It should be all jammy and thick and wrinkly when you push and not sloppy.  If you have slop, give it another minute or two and retest.

Allow to cool and then pour in to sterilised jam jars.

Drink the rest of the champagne to celebrate.

Christmas Biscotti / Sausage Biscuits

The biscuits are simply shortbread with 1/2 tsp of cinnamon and topped with cane sugar.

So, its been a busy old week.  There are other things I will show you in the new year but since they're gifts for people who read this blog they're staying under wraps for now.


So that just leaves me to say have a very merry Christmas and a wonderful New Year xxx


Monday 10 December 2012

Rudolf the Red Nosed Reindeer

once gave Santa's sleigh a lift.  And when mixed in with maltesers, makes a really simple gift.

Move over Bernie Taupin, there's a new kid in town.

Reindeer Noses


You will need:

1 bag of maltesers
1 bag of either red foiled chocolate balls or a bag of mixed m&m's and a willingness to eat everything that isnt red.  yum.  If youre in the UK a rather large supermarket chain beginning with T and ending in esco sells the ones I've used.
1 cellophane bag per person


Lob 8 maltesers and 1 red chocolate of choice in to the bag.  Tie with your pre-prepared rudolf labels.  Go.  


Requires absolutely no adult help once a child is
a) able to count to 8; and
b) able to resist eating the majority of the maltesers.

So, should be fine once they hit retirement.  Maybe.

Merry Christmas, Love Milly


Frosty the Snowman

Was a jolly happy soul.  I find that hard to believe given how moody all snowmen look, especially that one on the advert that you know wanted diamonds but ends up with gloves.  The power of love aint that strong.

So, crafting.  A while back I saw the cutest little snowmen on pinterest and decided to make them as part of our craft.  Unfortunately the geek in me refuses to read anything which may appear to be an instruction and I went on the wing in theory.  It was about 30 seconds in to said winging that I realised this is not a craft to do with a 4 year old or a 30 something year old with limited patience for things that ping out of your fingers.  Here are the instructions if you really want them.  They do look cute after all.

Pin it


You will need
(per snowman)

2 small white buttons, each with two holes
4 black seed beads (plus another 10 that will end up on the floor / down your top / in your eye)
1 medium brooch fastening
Strong Glue
Two pieces of felt (colour is your choice, but I had green and red in with it being Christmas so went with the pinterest picture)
Assorted small sequins
A cocktail stick
A large stiff drink.


Down the drink.  You're going to need it.

Cut a hat and bow tie shape out of the coloured felt and place on one side.  Tell yourself that this is going to be great.

Glue the two buttons in place on top of the brooch, so one appears to be the head and one the body.  Still tell yourself this is going to be great.

Hand the brooch to your child along with some pva glue, the cocktail stick and the beads.  They have small hands so it should be good for them, right.  Wrong.  Quickly realise that there is pva glue everywhere, apart from in the place you want it to be and the snowman appears to be melting since his eye is now somewhere near his navel.  Stop lying to yourself about the great thing, throw that one away and start again.  Allocate your child the job of passing things to you.  With the cocktail stick, blob in some strong glue just inside the button holes and drop the beads somewhere near to them.  Push in place and leave to the side to dry.  Repeat for all your buttons whilst slowing losing the will to live.

Meanwhile, get your small person to stick a sequin on to the bow tie.  Put a blob of glue on to the back and stick in to place on the snowman.  Do the same with the hat.

Be thankful that the buttons only came in small packets, put something Disney on the TV and relax.

Homemade snowman button brooch
Malevolent Snowman Army


Wednesday 28 November 2012

I'll have a blue christmas without you

I have a craft related injury thanks to a bit of a slip when machine quilting at the weekend (yes, that does hurt as much as you imagine) so one trip to a&e later and my finger is in a ridiculously over sized bandage which hinders my ability to do anything let alone craft.   So this week I am without hand meaing we went for a tried and tested craft that I know the small one can do almost entirely alone.  She just needs me to boil the kettle and the rest is down to her.

Rockin' robin


to save you searching back through the blog you will need
bag of bird seed
cookie cutters
one sachet of gelatine
straws
greaseproof paper

plus, to Christmas it up a bit

glitter
Christmas ribbon


This amount has made 6 large bird seed feeders and 4 small ones (so would probably make 7 large ones if you want them for gifts).   I wouldn't recommend making more than one sachet at a time because you want to make sure all of the seed is covered in gelatine.


Lay out a sheet of greaseproof paper on a flat surface.

Make up the gelatine according to the instructions on the packet and add the seed in.  Throw in a bit of glitter.

Chop up your straws to make holes for the ribbon.

Place your cookie cutter on the paper and sprinkle a little glitter inside.  The right way to do this is to put silver all over, pink at the top and blue at the bottom.  Anything else is wrong. FACT.  

You may need to wear a woolly hat at this stage to prevent glitter getting in your hair.


Fill your cutter with the sticky seed and press down with the back of a spoon.  Sprinkle some more glitter on top.  

Shove the straw in place and leave to dry overnight.  


We're at that stage now, so I'll do an update when they're dry.  We've also tried a little mini seed chain so if they work, I'll put a picture up.


Friday 23 November 2012

Santa Baby

I have been an awful good girl Santa baby so if you could see your way to that light blue convertible that I ask for in song every year it would be great.  You can still keep the sable though.  I'd rather than wasn't slipped anywhere, let alone under my tree.

Thanks

This craft was inspired by something I saw on pinterest last year which we had great fun reproducing it on the back of a cornflake box covered in wrapping paper.  This year we've taken it a bit further and added a few bits meaning we got to sing the same song over and over and over and over...

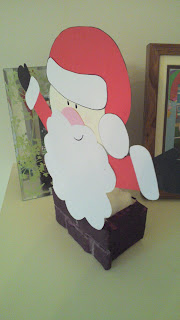
When Santa got stuck up the chimney


*sing it again*

You will need:
A teabag box 
4 or 5 pieces of kitchen roll
PVA glue
Paint
Assorted card (or white card that you are happy to paint)
Cotton wool
Sticky tape
A glue stick


First, prepare your chimney.

Open up your teabag box .  The lid is where we are going to stick our father Christmas later on so don't do anything to it.

Cut brick sized bits of card from whatever scraps you have.  We decided to just do the front of the box.  I know Milly has limited patience for repetition so making 5 bricks is fine.  Making 20 bricks would result in me doing all the work.  Once cut make sure that they can be positioned as you want on the box.

Next cut strips the width of your brick from one of the pieces of kitchen roll, roll and stick on top of each card brick using the tape.  Once completed tape the lot in to place.


Rip up the rest of the kitchen roll.  Mix together equal parts of pva glue and water and use this to stick the kitchen roll all over the box and bricks.  We're going for texture here so don't worry if they make a mess of it - glue is fun!  Leave to dry.

Now we're going to make Santa

Spend 5 minutes explaining how Santa is the same person as Father Christmas and not his brother.

Draw yourself a FATHER CHRISTMAS on paper to get an idea of the proportions if you want.  Go for simple shapes which will be easy to cut out from card and stick together rather than complex arty stuff.  You can make any sort of face, body, position etc that you want to but make sure he has a great bushy beard.  Transfer your drawing to card, cut out and hand over to the small person to stick together.  Leave to one side.

Now paint your chimney any colour you want.  We went for real feel red brown with grey cement because Milly is a fan of things looking correct, even if they are made of bits of ripped up kitchen roll.   Leave to dry.  Ours dried a lot darker than expected so if this causes a problem, tell them the big man comes at night.


To assemble, simply stick father Christmas to the chimney and fill the back with 24 balls of cotton wool.

Santa wishes he was holding hands with peppa pig.

Father Christmas Advent Calendar


Each morning during December until Christmas Eve your small person can take a ball of cotton wool and stick it on his beard using  glue stick.  When the beard is complete that means ITS CHRISTMAS!!!!


We've also been making Christmas cake and chutney ready for Christmas hampers.  Mill was less than impressed with the colour and texture of fruit cake.